How to Grow Organic Garlic
Gourmet garlic is easy to grow! Here is a guide on planting, growing, harvesting, curing and storing garlic throughout the year.
CHECK OUT GARLIC GROWING TIPS FOR EACH SEASON: FALL, SPRING, & SUMMER
FALL
Plant garlic in fall:
For best results plant your garlic in the fall (September through December). We plant our cloves in October and November in Washington state. You should try to plant before the ground freezes solid in the winter. See our garlic planting chart for the best time for your area.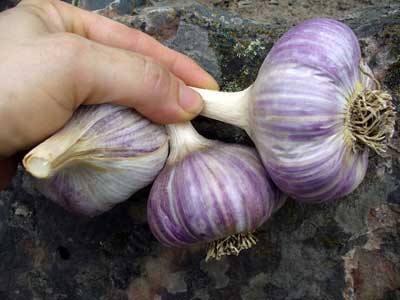
Picture: Savory Bogatyr garlic bulbs held in the hand but destined for a stir fry.
Choose a sunny garden spot:
Garlic likes full or partial sun. Most garlic growers recommend full sun; however, our garlic gets partial sun and does great. In really hot climates garlic may do better with afternoon shade to help shield garlic from the full heat of the day. We get full morning sun in our field which starts to shade around mid-afternoon (2 p.m. or later depending on the time of year). Interestingly, the garlic does better on the side of field with less sun but better soil!
Prepare soil before planting garlic:
For the largest bulbs, prep your garlic bed well. Garlic loves a rich fertile loam soil or a silty loam soil. Our garlic grows in a beautiful silty loam soil. WARNING: Do not plant garlic in poorly draining soil; garlic cloves can rot if they sit in water or mud part of the winter.
Add organic matter: What if you don't have the perfect soil? If you have sandy or clay soil add compost, humus, manure, or other organic matter to your soil and till or dig it in thoroughly. You can use all sorts of organic matter, even hay or dried grass clippings (make sure they are not treated with herbicides). One good option is to dig in weeds as green manure as long as the weeds don't have seeds (you don't want to accidently plant a weed bed).
Use green cover crop: You can also use a green cover crop (also called green manure) which is tilled into the soil in the fall. There are many options for cover crops such as peas, oats, buckwheat, sorghum, clover and more. The key is to select one that is right for your climate and for when it needs to grow. There are options for spring, summer, and fall planting. If you decide to use a cover crop you must kill the cover crop before it sets seed; otherwise you will have a weed problem. You can mow, cut or till down cover crops to prevent seed formation.
Add nitrogen if needed: If you use hay, straw, wood chips or similar materials you may need to add a little extra nitrogen to the soil. Organic substances can temporarily tie up nitrogen as they decompose which may leave less nitrogen for the garlic. After the organic matter decomposes it releases the nitrogen back into the soil (so you get it back later). Once organic matter breaks down it is known as humus. Humus helps soil maintain structure, improves nutrient uptake and retention, feeds nitrogen fixing bacteria, increases soil aeration, improves water holding capacity and helps prevent erosion.
How organic matter works: The organic matter will improve every soil type. Organic matter breaks up clay soils and allow better water penetration. It increases soil aggregate stability which holds soil particles together and helps soils retain their structure. Organic matter will help sandy soils retain moisture by increasing humus concentration and retain nutrients by improving cation exchange capacity. It also increases mineralization which is how much nitrogen, potassium, sulfur, phosphorus and other nutrients are released by soil bacteria. Organic matter makes compacted soils 'fluffier' and adds nutrients to poor soils.
In addition, garlic is a heavy feeder which means it likes lots of nutrients such as nitrogen, phosphorus and potassium. Adding organic matter for your crop to enjoy will give you the biggest and best tasting garlic. It will also supply most of the nutrients you need to grow great garlic.
Fluff soil: Don't forget to fluff your soil! Garlic is a root crop so soil should be soft and fluffy on the top 12-18 inches. You should be able to easily push your hand into the soil. It is extremely important to have well draining soil. Garlic cloves can rot in the ground if planted in a poor draining area.
One study found that no till garlic had 32-44% bulb loss (Bratsch et al. 2005). Conventionally planted garlic has a very high success rate. We expect to get much less than a 5% bulb loss in our market varieties (we call them our production varieties).
Consider getting a soil test in your garlic plot:
After you amend and prepare your soil take the time to get a soil test. Soil tests will measure what nutrients are already in your soil when you plant. That way you can add fertilizer in the spring if you need to do so to grow healthy bulbs.
Prepare garlic bulbs for planting:
Carefully separate each garlic bulb into individual cloves. Each clove will grow a new bulb of garlic. Be careful not to bruise the garlic with rough handling. Cuts and bruises could provide entry points for rot during the winter.
Plant garlic cloves:
Plant the garlic clove 4-6 inches deep. In areas with colder winters you should plant the garlic at least 5-6 inches deep and 4-8 inches apart. We space garlic 6 inches apart in rows, with rows 8 inches apart. You can make individual holes using a blunt handle (such as the end of a rake or shovel) or a bulb planter. You can also dig a trench 4-6 inches deep; lay in the garlic cloves and cover.
VERY IMPORTANT Garlic planting tip: make sure to plant the garlic right side up. The pointed end is the top side. This should be planted up. Garlic planted the wrong way will not grow as big or nice of a bulb. This is why all our garlic at Grey Duck Garlic is hand planted. For more pictures of which is the tip of the clove see our First Time Garlic Grower's Guide.
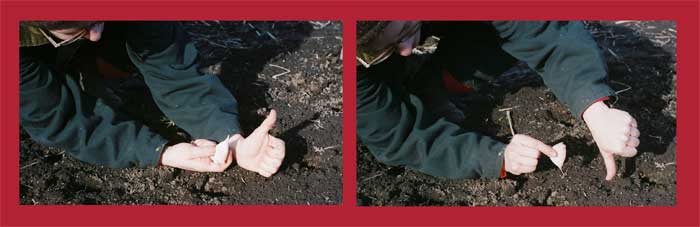
Left: the correct way to plant a garlic clove. Tip should be facing up. Garlic is placed in a 3-6 inch planting hole. Right: the wrong way to plant garlic; don't plant with the tip down or the resulting bulb will be twisted. Hardneck garlic is much pickier about this than softneck garlic.
Mulch the garlic bed in fall:
Mulch the garlic bed with compost, wood chips or hay. Mulching increases soil quality and nutrient availability for crops (Sinkevičienė et al. 2009). Straw mulch increased yield and marketability in no-till garlic (Bretsch et al. 2005). Note: we don't recommend no-till with garlic. Make sure that the hay is nice and fluffy or chopped up so that it lets some air through. You don’t want your garlic bed getting too wet or your garlic could rot.
Be careful of straw or hay mulches in wet climates or wet years. Heavy mulches may contribute to stem rot. In addition, straw from grain crops like wheat may carry stem rots that can transfer to garlic. If you notice signs of stem rot (browning or sliminess around the base of the plant), rake the mulch away from the garlic stalk. We have not noticed this problem with compost based mulches.
 Picture: Garlic beds mulched with composted manure. We have now switched to compost in our fields which we apply in the fall after planting. Straw worked well in dry years but we had to rake it away from the garlic in wet years.
We have tried mulching and not mulching the last several years. Mulching significantly prevents garlic cloves from heaving out of the ground during winter freeze thaw cycle (we have a lot of variable weather here). It also seems to contribute to larger garlic bulbs. Most important mulching will significantly decrease weed density in various crops (Sinkevičienė et al. 2009).
SPRING
Watch out for weeds:
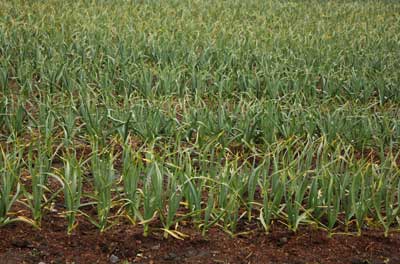
In late winter or early spring you will see your garlic sprouts emerging. Keep the plot well weeded; it is hard for garlic to compete with weeds. Weeds can reduce garlic yield by 1/3 to 1/2. Garlic that has to compete heavily with weeds has abnormally small bulbs with tiny cloves. One study found that garlic bulbs in weed free plots were 70% heavier than those in a weedy plot (Rahman et al. 2012).
It can also be difficult to harvest garlic hidden by weeds. If weeds happen I would advise trying to find your garlic though. you can still eat small bulbs and it may surprise you!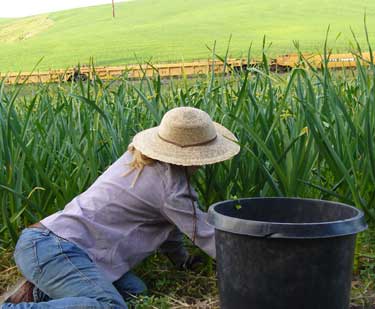
Picture: Patty weeds large hardneck garlic plants. We like to use nursery pots when weeding so we can feed the weeds to Jane's cows. Note the straw hat for sun protection.
Fertilize garlic while it is growing:
We usually add nitrogen twice during the year to our garlic. We add blood meal directly after planting and side dress with blood meal either once or twice after garlic comes up in the spring. Do not add nitrogen after garlic begins to form a seedhead or scape. If it has too much nitrogen at that time it will grow leaves instead of a bulb! We do not need to add other fertilizers. Our soil is very high in other nutrients due to all the manure we add as an amendment.
You may need to add a complete fertilizer. One important nutrient is potassium which helps to grow large garlic bulbs. Add potassium to your soil if needed for growing those large garlic heads.
A word on watering:
Hardneck garlic is ideally suited for dry climates; most garlic will do fine on 12-14 inches of rain during the growing season. Grey Duck Garlic grows dryland garlic which means we don't water our garlic. However, you may want to water in the spring or early summer if it is really dry. Don't keep the soil constantly moist or you risk garlic rot.
SUMMER
Garlic scapes:
Hardneck garlic forms scapes or “seedheads” in early summer. Scapes are composed of small bulblets which can grow more garlic. Scapes can be harvested to eat, left on the plant to mature or removed. Some people believe that removing the scapes makes the bulbs grow bigger. Studies show that if garlic is under any stress removing the scapes will result in bigger garlic bulbs.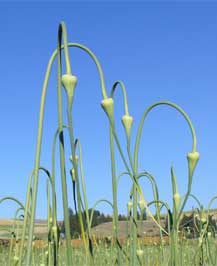
Picture: hardneck garlic scapes reach for the sky.
Harvest garlic:
Ideally the garlic should start drying out in early summer. The bottom leaves will start to dry out and turn brown. Garlic is ready to harvest when only the top 4-5 green leaves are left. You don’t want to leave it in the soil too long or the bulb quality will start to deteriorate. Dig or gently pull your garlic (if the soil is soft it will be easier to pull up the bulbs). Do not remove the stems yet.
Garlic varieties normally mature in the following order (list is from earliest to latest maturing): Tuban,Asiatic, Artichoke, Rocambole, Creole, Glazed Purple Stripe, Purple Stripe, Marbled Purple Stripe, Porcelain, and Silverskin. However, smaller plants will normally mature earlier than larger plants. If you grow different varieties, you may have a difference of 3-4 weeks or more between the earliest and latest varieties. 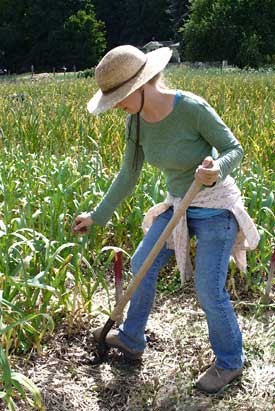
Picture: Patty harvests hardneck German Red garlic by digging bulbs. Be careful not to hit bulb with shovel (especially since it is always the large ones that get cut).
If the soil is soft garlic can be pulled by hand. Warning: when the soil is harder, digging is required or the garlic may break off in the soil. Dig far enough away from the plant to avoid cutting your garlic bulbs. We know from sad experience that it is always the biggest bulbs that get nicked by the shovel (and nobody wants to see a grown garlic grower cry)!
Curing garlic bulbs:
Hardneck garlic cannot be braided to store; the stems are hard. Cure the garlic bulbs by storing in a cool dry area with good air movement for 4-6 weeks. Some people hang garlic, we dry it on racks. Bulbs can be eaten ‘raw’ but will have a more mellow flavor and will store longer after curing (the bulbs you receive from Grey Duck Garlic are already cured). Once the stems are dry you can clip off the bulb and store in a dry airy place. We enjoy using both the raw and the cured bulbs in cooking.
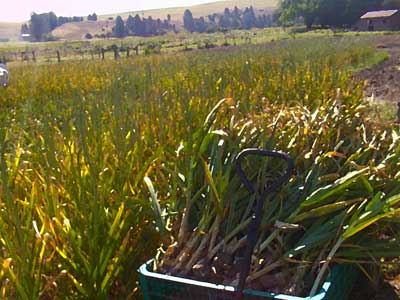 Picture: a wagon full of hardneck garlic bulbs ready to be pulled to the barn after harvest.
Garlic Bulb Storage:
Storage length of garlic depends on your storage conditions. For the longest storage time, place garlic in a cool (50-65ºF) dry area such as an unheated room. Do not store garlic in plastic or air tight containers or garlic will mold, rot or try to grow. Garlic will sprout if exposed to prolonged temperatures below 45ºF.
Garlic cloves can also be chopped and frozen for later use. See garlic cooking tips.
References:
- Bratsch T, Morse R, Shen Z, Benson B, Dept. of Horticulture, Virginia Tech. No-till Organic Culture of Garlic Utilizing Different Cover Crop Residues and Straw Mulch for Over-wintering Protection, Under Two Seasonal Levels of Organic Nitrogen. Virginia Vegetable, Small Fruit and Specialty Crops – November-December 2005. Full text.
- Rahman H, Khattak A, Sadiq M, Ullah K, Javaria S. Influence of different weed management practices on yield of garlic crop. Sarhad J. Agric. 2012;28:213-218. Full text.
- Sinkevičienė A, Jodaugienė D, Pupalienė R and Urbonienė M. The influence of organic mulches on soil properties and crop yield. Agronomy Research 2009:7:485–491. Full text.